Getting Started with OpenCart Part 1: System Settings
Written by HostJars in Tutorials on December 30, 2013 | 5 Comments
Welcome to the first installment of Getting Started with OpenCart! This series assumes that the reader has completed installing a fresh OpenCart store. We will provide a thorough guide for successfully setting up your first OpenCart store so that it is fully operational. If you are new to OpenCart, we hope this guide will serve as a great introduction to working with this robust ecommerce platform.
Let’s begin this series with the very basics: configuring your store’s System Settings. After your store has been installed, your OpenCart store will contain default settings provided with every install. These settings include a logo, store name, and other basic information; and extends to functionality like image sizing and product settings.
This blog will provide instructions for editing every setting found in System Settings, but you are not required to edit every setting. Unlike the product or sales section, these settings won’t require constant supervision.
Note: The screenshots shared in this blog are from a store in the latest version of OpenCart (v.1.5.6.1), but should be applicable for versions OpenCart v.1.5.0 and up.
System Settings
To access the System Settings, login to your OpenCart store’s administration. Hopefully you’ve taken the chance to browse through the administration side of your store, but if you haven’t the administration will be situated at http://yourstore.com/admin (unless you have changed the name of the admin folder). You will need to enter the login details entered in the Username and Password fields created in Step 3 – Configuration of the Installation process to access this area.
Once you are logged in to the administration, you can access the System Settings under System > Settings in the administration navigation bar.
If this is a fresh installation, only the default store will exist. If you choose to enable multistore in the future, you will see a list of stores configured with the multistore setup in this section. It should also display the url of each store under Store URL.
Click edit for your default store, which will be “Your Store” (Default).
General
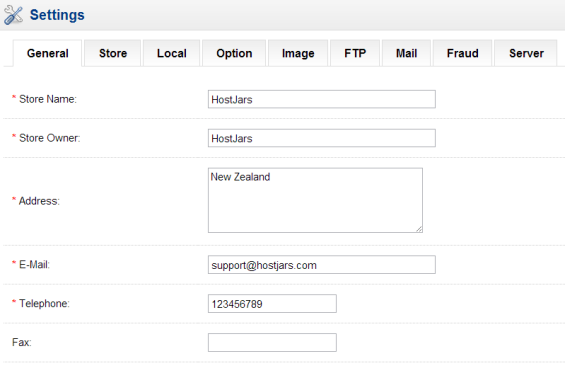
The first tab contains the General Settings that will be available to your customer in the store front: Store Name, Store Owner, Address, E-mail, Telephone, and Fax (if applicable).
You should fill this form before launching your store, as this data will pulled by OpenCart and displayed in your store front for your customer’s to see.
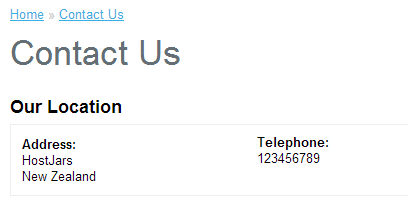
An important location that this data will displayed is the Contact Us page. This page can be accessed under http://your_store.com/index.php?route=information/contact, or from the Customer Service > Contact Us in the footer. The data from the form is displayed like so in the OpenCart default theme:
Store
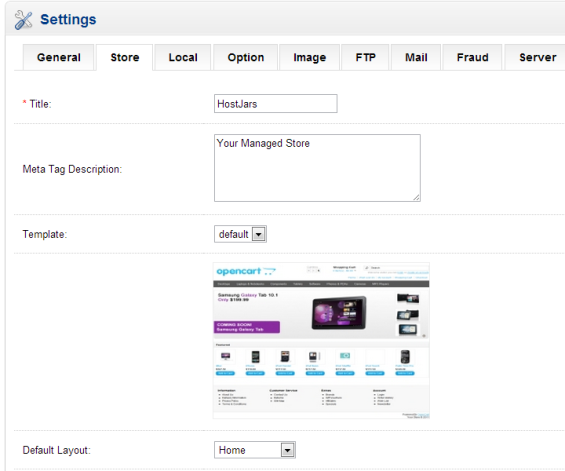
The Store tab contains the data that will be displayed for search engines:
The meta tag is hidden from view but will be displayed in the html for search engines to view:
<title>HostJars</title>
<meta name="description" content="Your Managed Store">
Template
The template field is where you will select the theme for your store. The default OpenCart theme will always be named “default”. When you have installed a custom theme, you can select the name of the theme here and the theme will be enabled in the store front.
We will cover themes more in depth in the 5th installment of this series, Part 5: Extensions, Modules, Themes.
Default Layout
A fresh OpenCart store will contain the following page layouts: Home, Account, Affiliate, Category, Checkout, Contact, Information, Manufacturer, Product, Sitemap and Default. These correspond to the layouts under System > Design > Layouts.
Oftentimes this setting is mistaken as the layout for the home page of the OpenCart store front. The main page will always be the home layout in a new OpenCart store unless otherwise specified (your_store.com/index.php?route=common/home). The default layout setting will instead account for any pages that do not have a layout. You won’t need to worry about this setting unless you have added custom pages, as the default OpenCart pages are already assigned to layouts. The custom pages will be displayed in the store front with the default layout set here.
Local
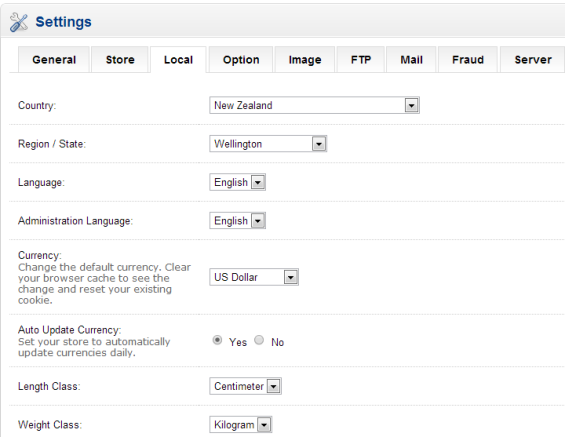
The local tab contains location based settings that will be applied universally across the store:
The Country and Region / State fields are relevant for applying taxes to products. If you plan to install multiple languages in your store, the language fields are the default languages that will appear in the store front and administration. The Auto Update Currency will automatically convert product prices based on their changing exchange rates.
The length and weight classes are designated here and included with product weight and length values to denote their units.
To set specific locations, languages, and currencies, please visit the System > Localisation section.
Option
The Option section has a variety of settings for Items, Products, Vouchers, Taxes, Account, Checkout, Stock, Affiliates, and Returns.
Items
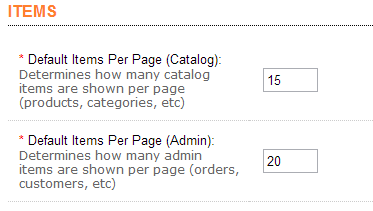
With Items you can control how many “items” can be displayed in the item list per page. These items can range from products listed in categories to manufacturer in the store front. In the administration, this can apply to products listed in the catalog to orders, and more.
Products
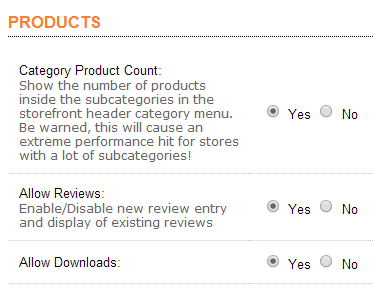
The products tab has settings that enabled/disable subcategories from displaying the amount of products assigned to them (Category Product Count), reviews from customers (Allow Reviews), and downloadable products (Allow Reviews).
The category product count will be displayed next to the subcategory in the navigation bar if Category Product count is set to Yes:
Vouchers
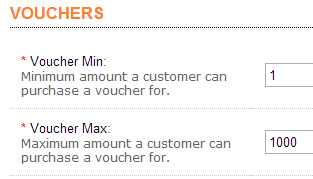
The voucher tab sets the minimum (Voucher Min) and maximum (Voucher Max) price that a customer can purchase a voucher.
Taxes
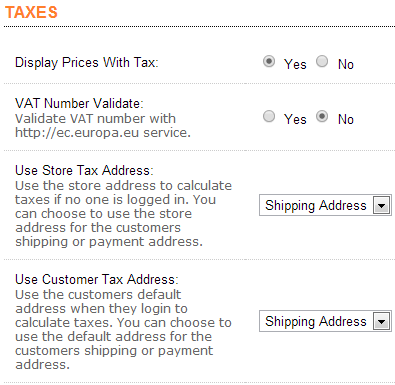
The tax section will let you configure various tax settings.
To display price including tax, select “Yes” for Display Prices with Tax; otherwise the tax will not be applied until the Shopping Cart. Below is how the price will be displayed with the tax on the product page:
The true price of the product is under Ex Tax, but with this setting enabled the tax price is added displaying $107.75.
Account
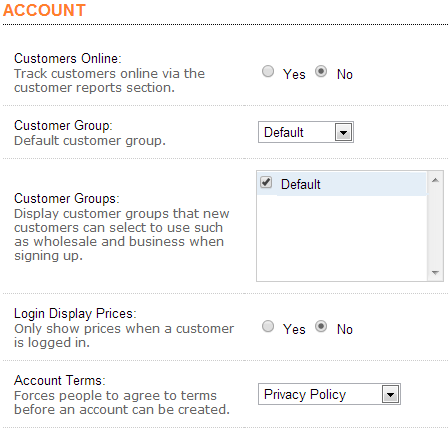
The account section contain the following settings:
Selecting Yes for Customers Online will allow you to utilize the Reports > Customers reports. This will track data like IP, pages visited, orders made, and reward points used per customer.
The default customer group is the group customers will be assigned to when first registering an account in your store. If you wish to assign all new customers to a different group, you may create a new group under Sales > Customers > Customer Groups.
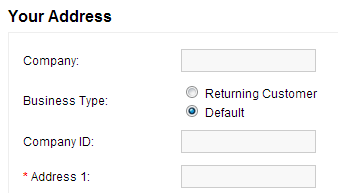
If you wish to make the customer choose between Customer Groups when registering their account, you can create more Customer Groups and check them on the list for “Customer Groups”. If only one group is selected, the customer group will not be displayed. A new select field “Business Type” will be added to the account registration page when more than one customer group is checked for this setting:
The Login Display Prices field can enable/disable the requirement for a customer to create an account and login in order the price of a product to be displayed to them.
The Account Terms will force the user to agree. The default conditions can be the following default information pages: About Us, Delivery Information, Privacy Policy, Terms & Agreements.
Checkout
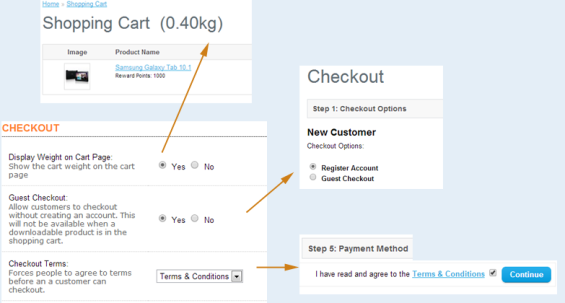
The checkout section affects the checkout process.
Selecting Yes for “Display Weight on Cart Page” will add the total weight of products in the shopping cart next to the Shopping Cart heading. Selecting Yes for Guest Checkout will add the option for the customer to complete the checkout process for a purchase without creating an account.
The option to create an account will still be available, but it will not be required in order to Continue to Step 2 of the Checkout.
Setting conditions for Checkout Terms forces the customer to agree to these terms in Step 5: Payment Method of the Checkout.
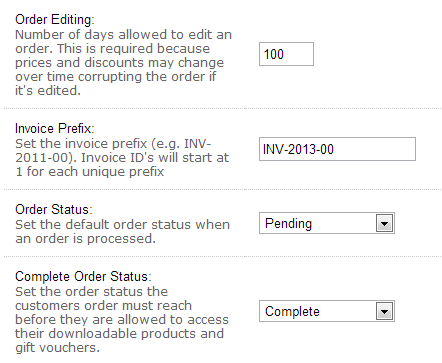
The rest of the Checkout settings are self-explanatory. The order editing setting can cause some frustration down the line, since it’s not often that you need to edit these settings. In the future the store administrator may attempt to edit an order but finds they cannot. In this situation, it’s a good idea to check the System Settings to see if the order was made within the days of that setting.
The Order and Complete Order statuses can display a different message to the customer in their Account (Order History). The default statuses are Canceled, Reversal, Chargeback, Complete, Denied, Expired, Failed, Pending, Processed, and Processing.
Stock
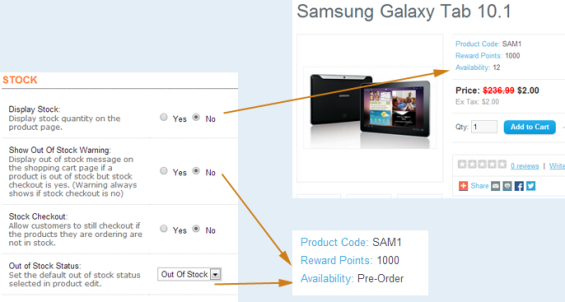
The stock section has settings that will affect the display of the quantity field in the store front.
When Display Stock is set to Yes, the quantity of the product will be displayed in the store front under Availability.
If the product quantity is set to 0, an Out of Stock status can be displayed in the Availability section of the product page.
The Stock Checkout field lets the customer checkout a product even if the quantity is 0.
The Out of Stock Status can be any of the default status fields. This will be displayed if Show Out Of Stock Warning is set to Yes.
Affiliates and Returns
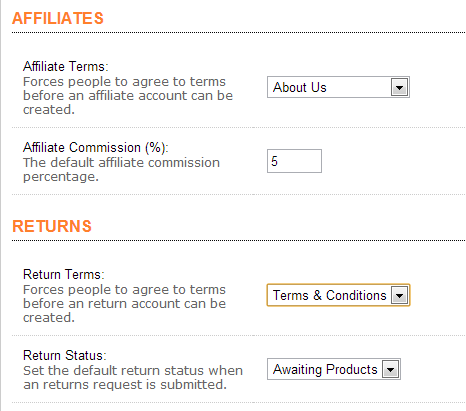
The Affiliates and Returns section allows you to force your affiliates and customers returning products to agree to terms set in this setting. In addition, you can set the commission an affiliate makes for referring a customer purchase; and set up a Return Status that will be displayed for the customer in their Order History.
Image
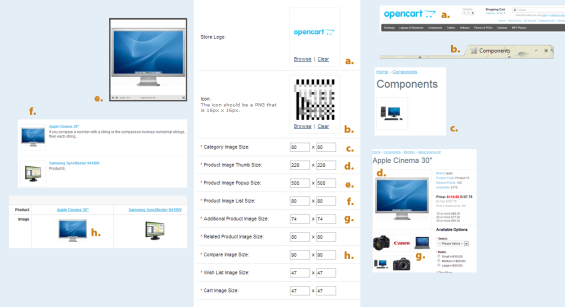
The Image tab gives you the flexibility to set the image sizes of products and various icons/logos in your store front. A product image will be displayed on multiple sizes depending on which layout it is displayed on, and the location on the page in which it is displayed. The illustration below shows where in the store front these image size will be affected:
Feel free to browse the store front to see where these images are located.
Configuring the Mail setting is necessary if you wish to send you customers emails through OpenCart for order confirmation and account registration. You have to option to use your host’s mail capabilities, or an SMTP like gmail or hotmail. If you choose sending emails from the host, you will need to make sure that the PHP mail is enabled with your host. If you choose to go the SMTP route, you will need to add in the host, username, password, port, and timeout to handle the outgoing emails.
In this section you can also send alert emails whenever a new order or new account is made in your store. By default the email will go to the store owner email set in General > E-mail of System Settings for your store. If you wish to add additional emails to receive these alerts, add them to the Additional Alert E-Mails setting.
Server
The server settings contain mostly “hidden” settings, rather than settings that directly affect how the store is displayed or product is managed. These settings usually require additional steps to be fully enabled, but can be turned on and off here.
SSL requires a valid SSL certificate, and the admin and root config.php files will need to be modified. Once those steps are competed, you can enable SSL in this section.
Shared Sessions is especially useful for a multistore configuration, as each store will have it’s own PHP session.
The Server tab concludes the last of the System Settings. To apply these settings, click Save in the top right corner.
Congratulations, you have completed the first step of setting up your first successful OpenCart store. The next installation of this article will cover accepting payments and adding taxes to your OpenCart store!






5 Comments on "Getting Started with OpenCart Part 1: System Settings"
No matter if some one searches for his essential
thing, thus he/she desires to be available that in detail,
so that thing is maintained over here.
Hi, Can you please tell me where this “Allow downloads” option is in the latest version 2.0 please?
Thanks
Tissy
Thanks a lot !
None of the images referenced on this webpage exist in the web URL.
Fixed the image issue