How to Use Weight Based Shipping For Multiple Flat Rates
Written by Johnathan Shaw in Tutorials on May 13, 2013 | 24 Comments

Do you want a second (or third, or fourth) flat rate for your site’s shipping? OpenCart doesn’t include a shipping method that allows for multiple flat rates by default, but you can easily set up multiple flat shipping options using the built-in Weight Based Shipping extension.
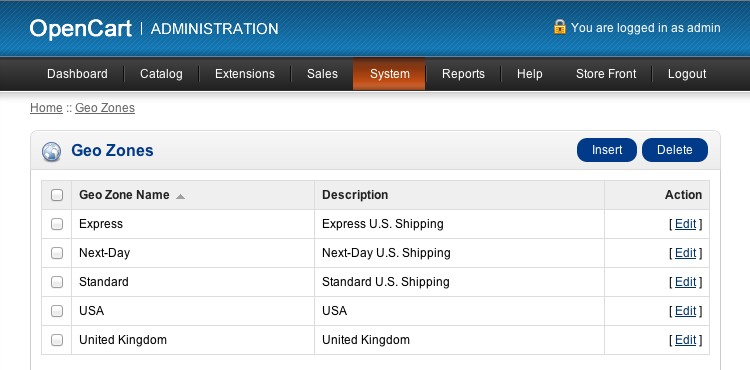
1. In System > Localisation > Geo Zones, set up a duplicate geo zone for each flat rate that you want. For example, if you wanted these three shipping options available to the U.S.:
- Standard: $5.00
- Express: $12.00
- Next-Day: $18.00
then you would create three geo zones all with United States selected as the country, named “Standard”, “Express”, and “Next-Day”.
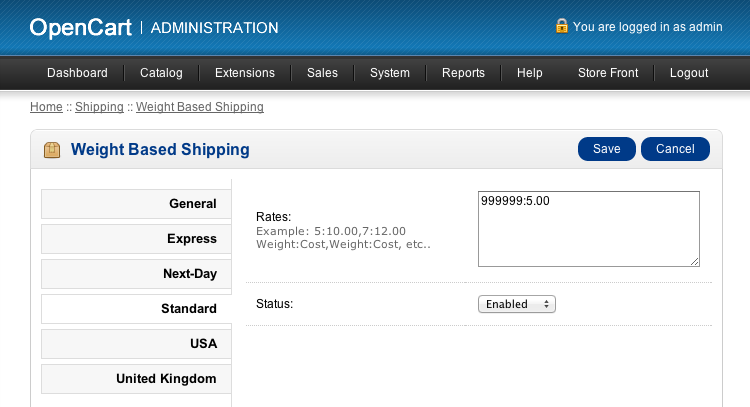
2. In Extensions > Shipping > Weight Based Shipping, create a rate for each geo zone with a rate (in the format Weight:Cost) like so:
RATE #1
- Geo Zone: Standard
- Rates: 999999:5.00
RATE #2
- Geo Zone: Express
- Rates: 999999:12.00
RATE #3
- Geo Zone: Next-Day
- Rates: 999999:18.00
Don’t forget to enable the extension as a whole in the “General” tab, and each geo zone in its own tab. If you have other geo zones for other purposes (such as the “USA” and “United Kingdom” geo zones in the example screenshot) then leave those disabled in their tabs. If you need a tax rate applied to the shipping costs, then select the Tax Class in the “General” tab.
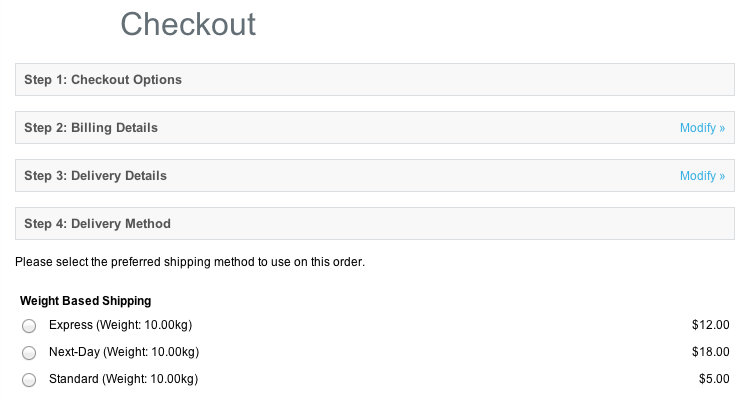
3. During checkout, each option will be presented to the customer on the “Delivery Method” step. They are ordered alphabetically by name, so if you need them in a particular order then you should name them accordingly.
4. If you want to change the name of the shipping method heading, you can do so in /catalog/language/english/shipping/weight.php . If you want to remove the cart weight that is attached to each rate title, then you can make the following edit:
IN:
/catalog/model/shipping/weight.php
REPLACE:
$result['name'] . ' (' . $this->language->get('text_weight') . ' ' . $this->weight->format($weight, $this->config->get('config_weight_class_id')) . ')',
WITH:
$result['name']
And that’s it! Your OpenCart store now has multiple flat rate shipping options for your customer.


24 Comments on "How to Use Weight Based Shipping For Multiple Flat Rates"
Hi , Thank’s for the tutorial. I want to ask you if I can desapear the “Flat rate” from displaying.
If I disable or unsinstall from admin the OC can’t calculate give me error….
Any idea?
I Want add Shipping Charge In Price and Show Them On Product Page In Price. How I Do This..?
Example :- Product Price Is 100$
Shipping Charge is 5$
Now I Want To Show Product Price 105$ On Product Page As Price.
Thanks In Advance.
Hi,
Sorry, I’m new to FTP and such, but how do I change the name of the shipping method in weight.php file? Which part should I edit? Thanks in advance!
Hello,
This is a wonderful and easy to follow tutorial. However, I have a constant problem. I followed all the steps but still this shipment method does not show up during checkout. I’ve enabled the extension as a whole in the “General” tab, and each geo zone in its own tab. Could you give me some advice?
Thank you in advance!
Thank you so much for this!! Worked perfectly.
Except this bit to remove the displayed cart weight -
IN:
/catalog/model/shipping/weight.php
REPLACE:
$result['name'] . ‘ (‘ . $this->language->get(‘text_weight’) . ‘ ‘ . $this->weight->format($weight, $this->config->get(‘config_weight_class_id’)) . ‘)’,
WITH:
$result['name']
SHOULD REPLACE WITH:
$result['name'],
Thanks a lot!!! This helped a LOT!!!! Thanks for sharing!
The tutorial should show you how to do that. You would create the appropriate geo zones (12 for standard, 12 for express) and then enter the rates appropriately. You’d essentially have 12 duplicates of geo zones, so that two options appear during checkout for each geo zone.
i meant to say weight based shipping. how do i create two diff weight based shipping, each having different zones
To work properly you need to assign a weight to every product. If it is not set you’ll get an error when checking out.
I have just discovered this. Thanks for the tutorial.
If you only want Express showing, then setting its “Status” setting to “Disabled” in the Weight Based Shipping admin panel.
if i add deliervy address Geo Zone: Express then i want to show only Geo Zone: Express shippping cost bez i pay for this zone shiping then why show all how it possible
This was amazingly helpful - especially when you’re dealing with multiple regions and rural delivery options. Thank you SO much.
Thanks ! Now it works - I was deleting that last comma right after square bracket - that was the problem .
what this warning mean?Warning: rreqiue_once(home/test/public_html/system/startup.php) [function.require-once]: failed to open stream: No such file or directory in /home/test/public_html/admin/index.php on line 19Fatal error: rreqiue_once() [function.require]: Failed opening rreqiued home/test/public_html/system/startup.php’ (include_path=’.:/usr/lib/php’) in /home/test/public_html/admin/index.php on line 19
My last comment should read:
…the browser is rendering > as > ; which…
Hi Jan — that error means you didn’t do the edit correctly. Make sure you follow it exactly — I recommend using the “Find” function of your text editor to make sure you’ve selected precisely the correct text. Right now, it looks like the browser is rendering the > as > which it should be doing, so you may need to do that to make sure you have the right line. Once finished, the line should read:
‘title’ => $result['name'],
Hi
Everything works like a charm but when I want to remove cart weight I get this error
Parse error: syntax error, unexpected T_CONSTANT_ENCAPSED_STRING, expecting ‘)’ in /home/content/31/11535131/html/catalog/model/shipping/weight.php on line 46
Many thanks, saved me a lot of time.
Great tutorial! Really a great hack that you’ve come up with here.
Many, many thanks…too simple that I was looking for a module…
Thank you.
Thank you very much for this! It was way simpler than trying to make a module work somehow.
Thank you so much for this tutorial.
Nice tuts. Thanks Jonathan